How to bring Google’s remarkable Pixel 9 reminder system to any Android device
If there’s one envy-worthy feature in Google’s new Pixel 9 devices, it isn’t any of the AI-oozing mumbo-jumbo Google desperately wants you to desire.
Nope — it’s a touch so small and simple, Google hasn’t so much as even mentioned it in any of its Pixel 9 promotions. Hardly anyone else has talked about it, either. Heck, you might not even notice it when using the phones.
But goodness gracious, is it ever worth your while to chew over. The feature of which we speak is a new device-wide reminders system that makes it impossibly easy to capture a reminder around anything you’re doing, anywhere on your phone, and then have it come back to demand your attention at exactly the right time.
It’s hands-down my favorite new Pixel feature and something that might just inspire me to make the leap to a shiny new Pixel 9 model, despite the fact that my current personal Pixel 8 Pro phone is perfectly fine and otherwise quite similar.
I’ve found this feature so forkin’ helpful during my time with a Pixel 9 review unit, in fact, that I decided I had to find a way to recreate it in a way that everyone could appreciate and benefit from — no matter what type of Android device you might be using at the moment.
And man, lemme tell ya: It wasn’t easy. Like most creative workarounds along these lines (hello, Pixel 9 Call Notes!), the solution for emulating a feature like this in an external environment is inevitably a little less seamless and native-feeling than the original — and also considerably more complicated to cook up.
But oh, does it ever get the job done and bring that same sort of universal reminder goodness onto whatever Android phone you’re caressing these days. And if you value organization and brain-aiding reminders as much as I do, you’ll absolutely appreciate the addition.
[Psst: Want even more advanced Android knowledge? Check out my free Android Shortcut Supercourse to learn tons of time-saving tricks for your phone!]
Google’s Pixel 9 reminder brilliance
Before we get into the specifics, let me give you a quick reminder about what the Pixel 9 system we’re emulating actually accomplishes and how it works.
The Pixel 9 reminders system is tied directly into the Android screenshot function: Anytime you see anything you want to be reminded of later — a message you need to reply to at some specific future point, an email you want to revisit at the end of the day, or anything else you encounter anywhere on your phone and don’t want to forget — you simply snag a screenshot (by pressing the phone’s power and volume-down buttons at the same time or using any other Android screenshot shortcut).
As part of its standard screenshot confirmation pop-up, the Pixel 9 presents you with a new bell-shaped icon. Tapping that icon reveals a special new panel that lets you set a reminder around that screenshot for any specific future day and time you want.
JR Raphael, IDG
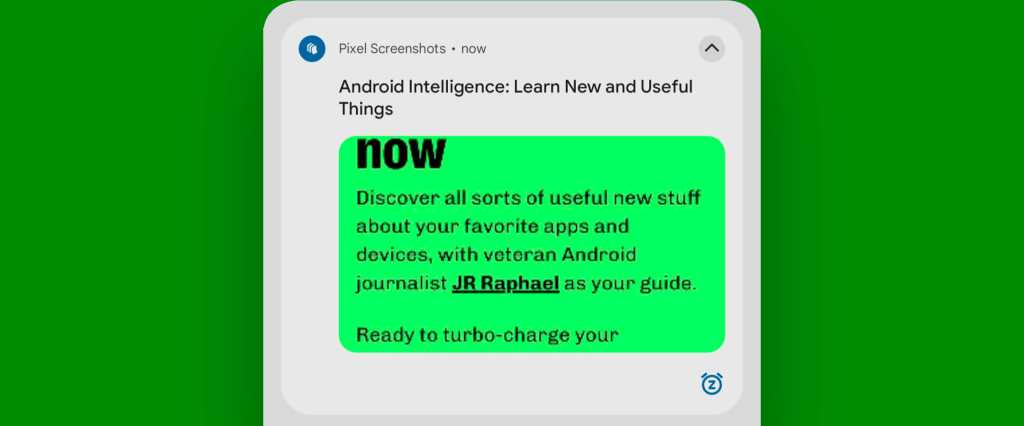
When that time arrives, the Pixel 9 serves up a notification that shows you the screenshot along with some added context about what the image contains.
JR Raphael, IDG
Handy, no? So now, let’s look at how we can create something similar in concept on any non-Pixel-9 Android device you might be using.
You’ve got two possible paths to pick — the easy, minimal-setup route that works reasonably well and the slightly-complex-to-configure pure awesomeness option that automates everything and makes the ongoing reminder creation process almost as powerful as what’s present on the Pixel 9.
Choose your own adventure…
Pixel 9 screenshot reminder recreation: The easy path
First up is the easy-to-implement, minimal-hassle-requiring path that’ll be the right approach for most Android phone-owners.
For a super-simple, almost-effortless way to emulate the Pixel 9’s universal reminder system on any Android device, you need just one ingredient: the free and readily available Microsoft To Do app for Android.
We want to use this app, specifically, because of the way it integrates with Android’s system-level sharing system and makes it especially easy to pass over info from a freshly captured screenshot and then create a reminder around it. Most other similar apps, including Google’s own generally excellent Keep Android note-taking service, don’t handle this particular feat quite as well. Microsoft To Do is the tool for the job.
So, to start:
- Download Microsoft To Do from the Play Store, if you don’t already have it.
- Open up the app once and follow its prompts to sign in.
- Approve any pertinent permissions, including the ability for the app to show you notifications and create reminders/alarms.
Got it? Good. Now, when you’re ready to capture a reminder of anything you see anywhere on your device:
- Create a screenshot — again, by pressing your phone’s power and volume-down buttons at the same time or by using any other Android screenshot shortcut.
- When you see the screenshot confirmation pop up, tap the share icon within it.
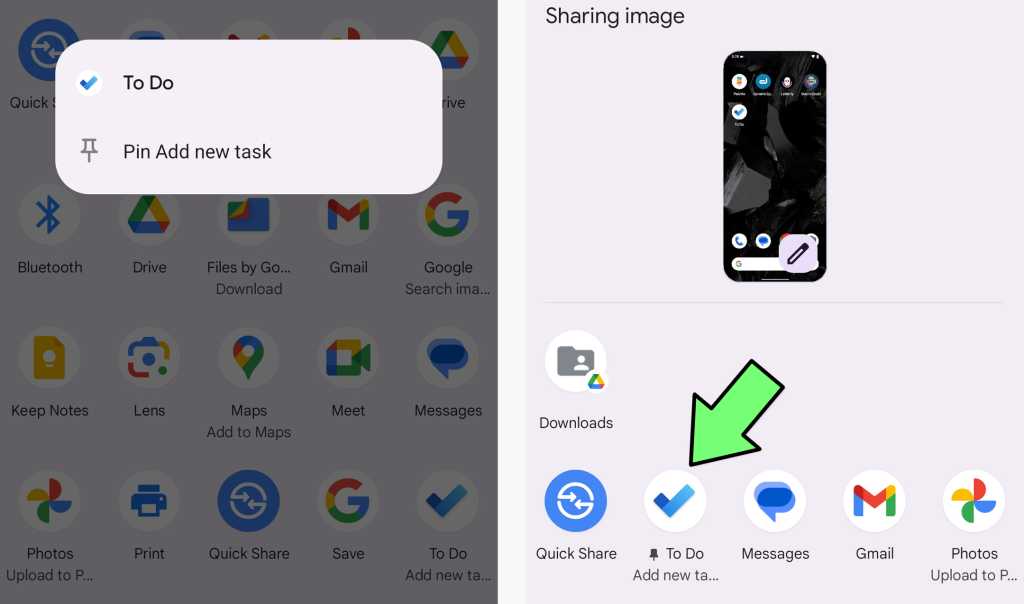
- You should see “To Do,” with a blue checkmark icon, within the panel of sharing options that appears next. Press and hold your finger onto that icon and then tap the line that says “Pin Add to new task.”
- That’ll cause the shortcut to show up at the very top of your system-level sharing list from that moment forward, for especially easy ongoing access.
JR Raphael, IDG
From there on out, whenever you want to capture a reminder about anything in the style of the Pixel 9 reminders system, you can simply take a screenshot — then tap the share button followed by the “To Do” icon.
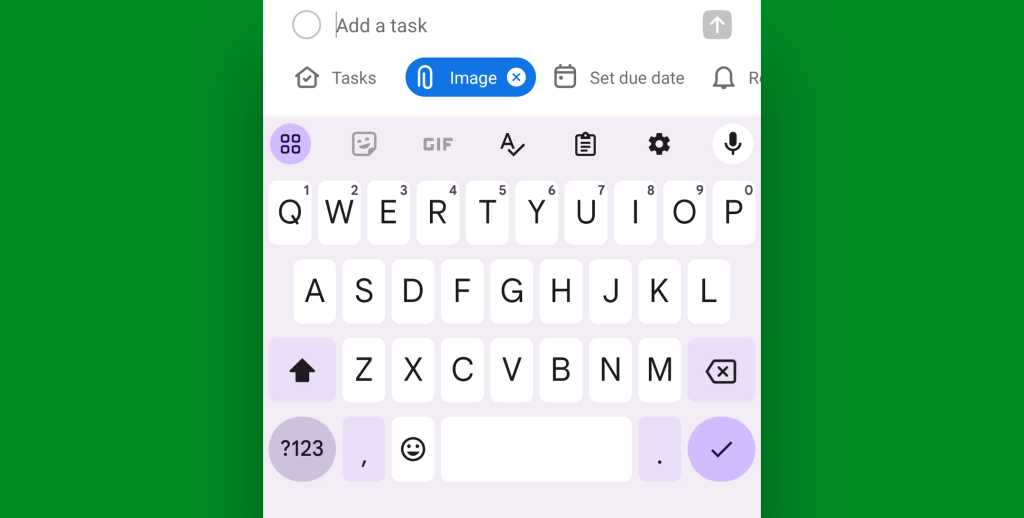
That’ll summon a special little pop-up that looks a little somethin’ like this:
JR Raphael, IDG
All that’s left is to tap the “Remind me” option within the horizontally scrolling line at the bottom of that pop-up and select whatever date and time you want the reminder to fire. You’ll need to type something into the “Add a task” text field, too. You could use a word or two to act as a title for the reminder or even just type in a single period or random character to fill the space.
Whatever you choose, your contextual reminder will then be set — and you’ll receive a notification with the info and the screenshot attached when the date and time you selected arrives.

JR Raphael, IDG
Like I said, it’s not quite as streamlined of a process as what the Pixel 9 gives you, and it takes a teensy bit of ongoing effort. But it gets the job done and gives you a super-simple framework for accomplishing the same sort of anywhere-on-Android, context-containing, screenshot-centric reminders.
If you want to make it even easier on yourself and don’t mind a more complex initial setup, keep reading.
Pixel 9 screenshot reminder recreation: The advanced option
The most satisfying way to give yourself a truly Pixel-9-like screenshot reminders setup is with a touch of crafty Android automation.
Now, fair warning: This path is really appropriate only for more advanced Android device-owners who don’t mind a little ambitious tinkering. Most people would be better off with the “lite” version of this setup that we just went over. But while the initial setup here isn’t exactly simple, you’ll only have to do it once, if you’re up for it — from that point onward, your screenshot reminders will be almost as easy and effortless as what the Pixel 9 provides.
For this path, you’ll need two core ingredients:
- The same Microsoft To Do Android app we went over in the previous section. If you don’t already have it, download it, open it once, and follow the prompts to sign in and grant it all the pertinent permissions.
- A brilliant Android automation app called MacroDroid. It’s free with an optional $5 upgrade to eliminate ads throughout its setup interface and to enable some extra features (which aren’t required for anything we’ll tackle today).
To set this up — and again, remember, you’ll only have to do this once:
- Open up MacroDroid and make your way through the app’s welcome screens and basic permission prompts.
- On the main MacroDroid screen, tap the big “Add Macro” button in the upper-left corner.
- Within the “Triggers” box, tap the plus icon, then select “User Input” followed by “Volume Button Pressed.”
- Select “Use Accessibility Service” and tap “OK.”
- Select “Volume Up + Volume Down (Long Press)” and tap “OK.”
- Select “Retain Previous Volume” and tap “OK.”
At this point, MacroDroid will likely send you a notification informing you that it requires an additional permission in order to handle this part of the process. Swipe down twice from the top of your screen to find the notification, then tap it and follow the prompts to enable Android accessibility access for “MacroDroid Volume Button Monitor.” You’ll want to be sure to activate the top toggle for that option and not the “shortcut” option lower down on the same screen.
You’ll probably see a scary-sounding warning confirming that you want to grant the app this access. It sounds like a lot, but this is genuinely what’s required for MacroDroid — or any app — to be able to monitor your volume button presses and react to them in real-time. MacroDroid is a known and trusted app that’s been around forever, and its developer is adamant about the fact that no user data is ever shared or sold in any way.
Cool? Cool. Now, next:
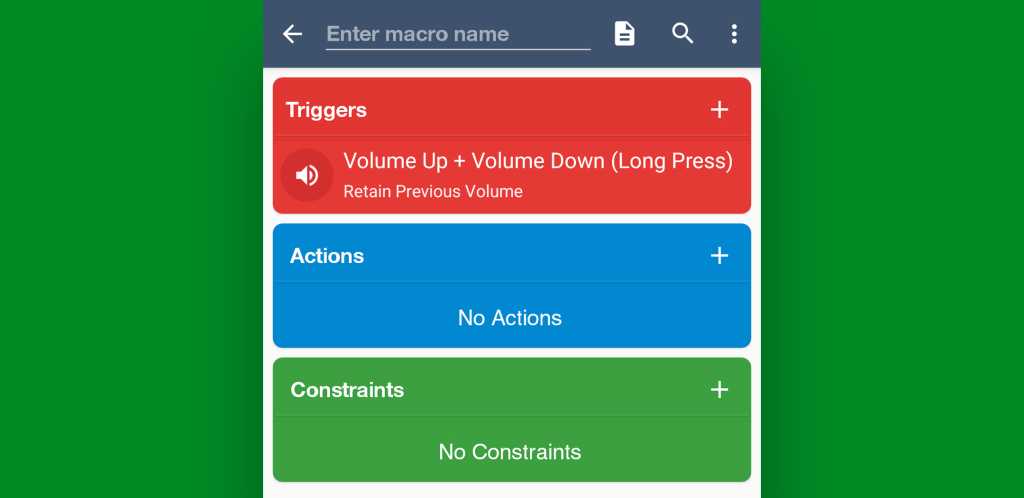
- Head back to MacroDroid and the setup screen we were just working on. It should now look a little somethin’ like this:
JR Raphael, IDG
- This time, tap the plus icon within the “Actions” box, then tap “Screen” followed by “Read Screenshot Contents.” You’ll be prompted to enable Android accessibility access once more, this time for “MacroDroid UI Interaction.” Follow the same process as before to do this.
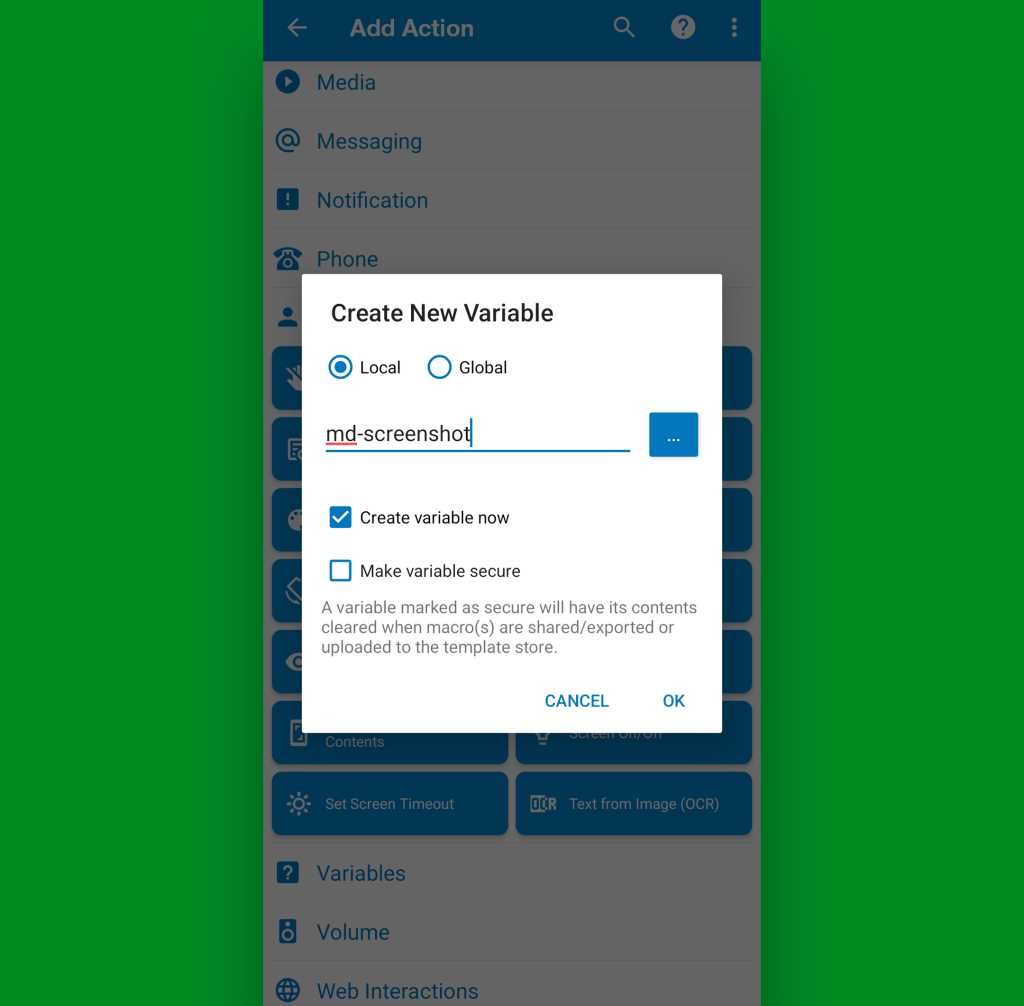
- Once you’ve granted the necessary permission, you’ll probably have to tap that “Read Screenshot Contents” box once more to select it. Do that, then select “[New Variable]” and tap “OK.”
- When prompted, type in md-screenshot for the variable name and tap “OK.”
JR Raphael, IDG
- On the next three prompts that pop up, leave the default options selected and simply tap “OK.”
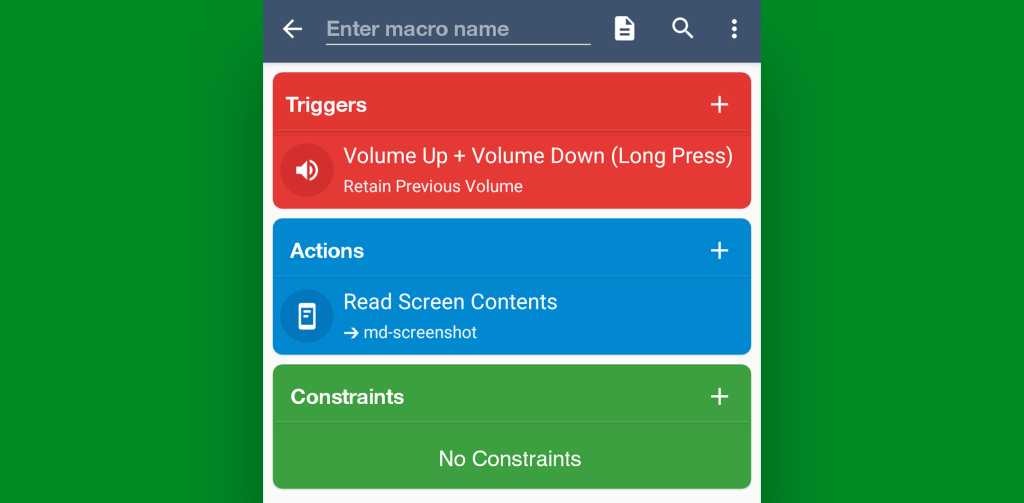
- You should then see the main MacroDroid creation screen again with your newly added line present within the “Actions” area.
JR Raphael, IDG
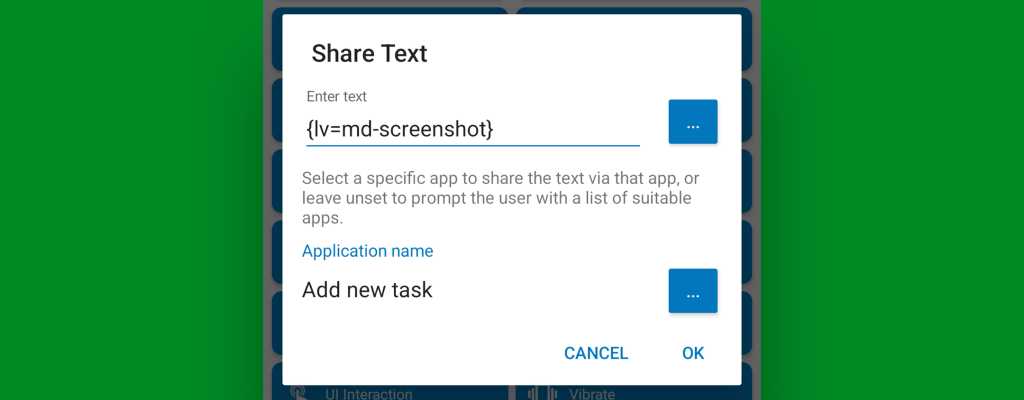
- One last time — almost done! — tap the plus icon within the “Actions” box, and this time, select “Device Actions” followed by “Share Text.”
- In the pop-up that appears next, tap the first “…” button — alongside the “Enter text” field — then tap “OK” once, select “Local Variable” and tap “OK,” and select “md-screenshot” and tap “OK.”
- Tap “OK” once more on the next prompt that shows up.
- And last but not least, tap the second “…” button, under “Application Name,” then select “Add new task” and tap “OK.”
That should leave you with a box that looks like this:
JR Raphael, IDG
Finally, tap “OK” — then tap the field where you see “Enter macro name,” type in Screenshot reminder, and tap the left-facing arrow in the corner of the screen and select “Save.”
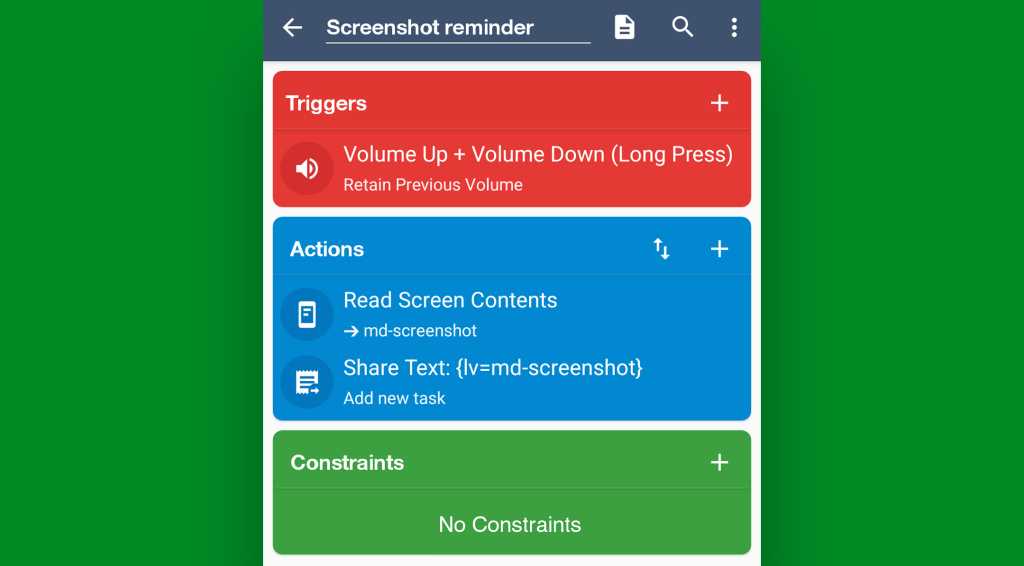
JR Raphael, IDG
Aaaand, take a deep breath: Our initial setup for this is now officially finished — and that means you’re ready to test out your fancy new Pixel-9-inspired Android screenshot reminder system!
This is where the true beauty of this approach becomes apparent. Anytime you want to snag a new screenshot reminder, all you’ve gotta do is press and hold your volume-up and volume-down keys together for a second or so — no matter what’s on your screen or what else you’re doing on your device.
And, hey — wouldya look at that?!
JR Raphael, IDG
That special key combo — volume-up and volume-down together — is now your custom shortcut for snagging a screenshot and setting a reminder from it, from anywhere on your phone. Pressing those buttons together will automatically capture the screenshot, pull out the pertinent text from the screenshot, and share it into a new reminder within Microsoft To-Do.
(The text interpretation can be slightly hit and miss sometimes, depending on the context, but it’ll usually get enough of the gist to make it work. And you can always add in extra info on your own, too, if you want to expand or adjust it.)
All that’s left is tap that “Remind me” option to set the reminder date and time for whenever you want, then tap the up-facing arrow to save it.
And when whatever time you selected arrives — boom: Your reminder appears.

JR Raphael, IDG
A pretty powerful new productivity perk, wouldn’t ya say?
It may not be quite as simple, seamless, or elegant as what the Pixel 9 pulls off in this area — but if you aren’t getting a Pixel 9 series phone, it’s your next best option for a similar sort of universal contextual reminder system.
And it’ll absolutely get the job done and let you create easy and effective reminders around anything, anytime — with nothing but a fast press and tap from anywhere within Android.
Get even more advanced shortcut knowledge with my free Android Shortcut Supercourse. You’ll learn tons of time-saving tricks for your phone!

